Showing posts with label Workshops. Show all posts

Tuesday, 27 November 2012

Design Practice III//Print Workshop IV.


Notes from today's print workshop with technician/tutor, Mike Flower.

NOTES

//


* Out putting PDFs...

Adobe PDF Presets > Press Quality (going to print), Smallest File Size (For proofs to clients, emails, etc), High Quality Print (Digital and laser, not quite good enough for commercial print).

* Individual printers will have different requirements.
* Make sure all images are CMYK (will automatically occur when you save as print PDF- stays as RGB for interactive- only for pre press).
* Include bleed in PDF
* Make PostScript file through Print... Use print dialogue box... Printer... PostScript file.

* PostScript can make positives when screen printing (in digital print resource- can make A2 separations, only available when working with a PostScript File/Printer- does not work with inkjet printers).
* Come and ask Mike for file to copy if we want it on our computers/laptops at a later date.
* Save PostScript file as a PS file.

* Make PDF file of printers spreads...
> Print Booklet > Adobe Settings > PostScript File > Adobe PDF 9.0 (You dont' see a preview in print booklet) > Save printer's spreads (now available) > Drag into Acrobat Distiller to turn it into a PDF based on PDF quality settings.

* Working with multiple images on a page...
> Save image/export as press quality PDF with bleed and crop marks.
> To place PDF... File > Place > Open... Creating an InDesign file within an InDesign file (InDesign INCEPTION).
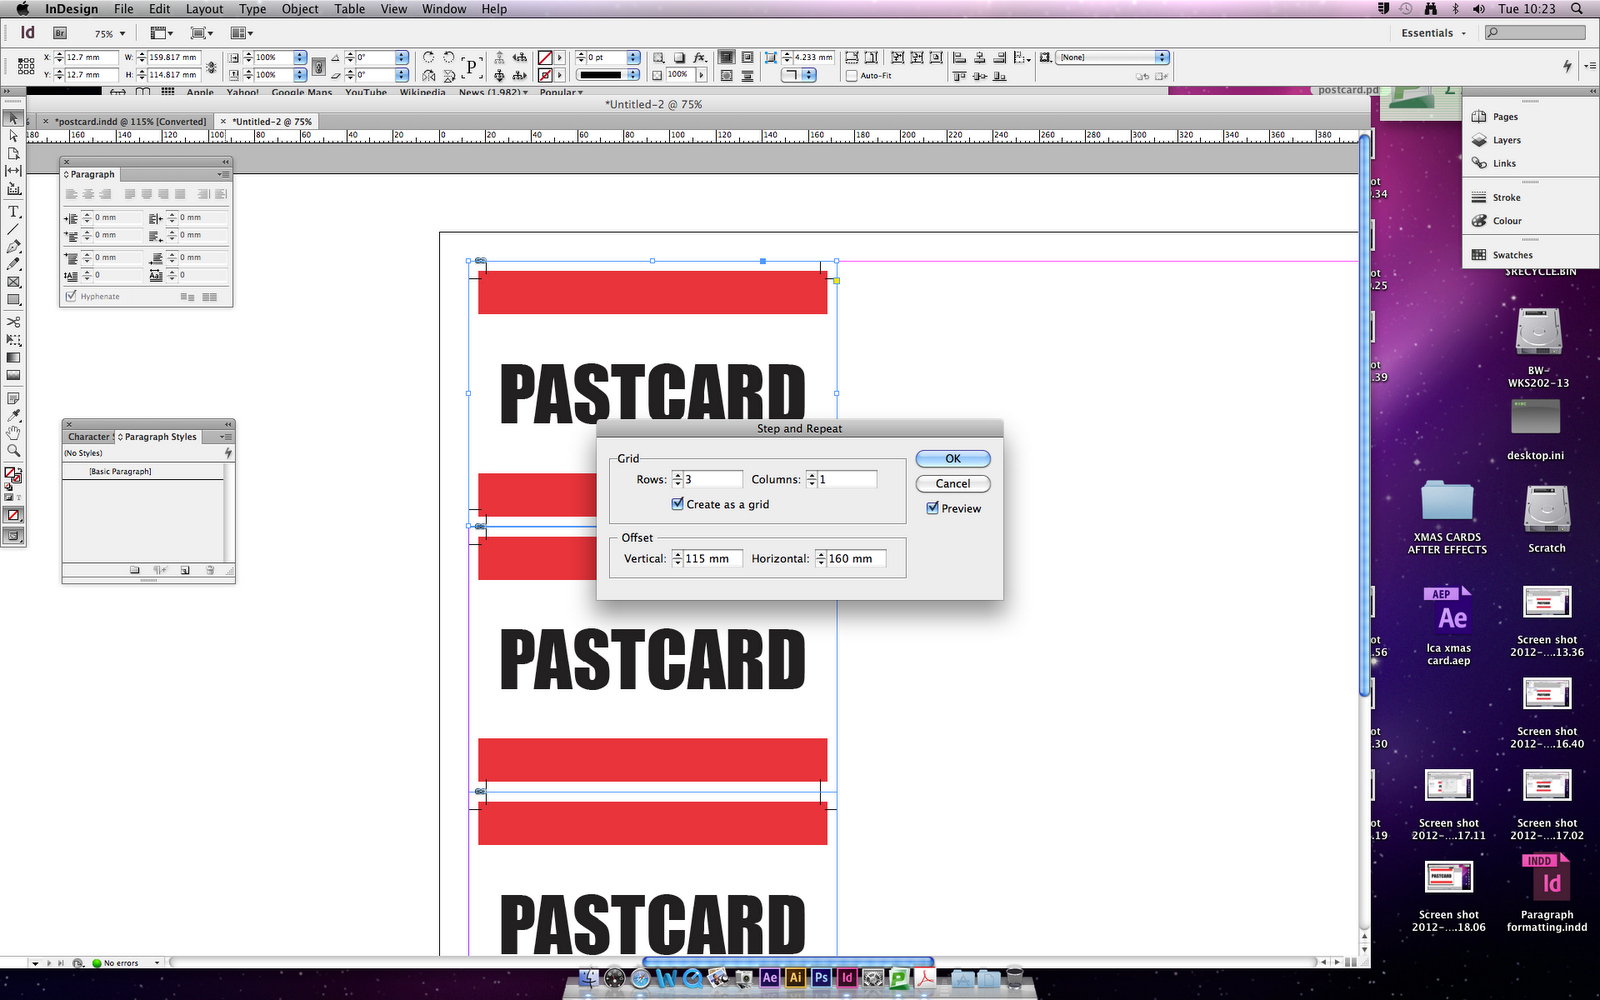
> Edit > Step and repeat, layout repeated, images in a gridded structure.
> Double- sided, 2 page A2, print in digital print- would need to centre it in the page.
> Align to centre of the page.
> Click 'Align to page' and then horizontal and vertical alignment (Images need to be grouped as one object).

* If you notice (possible scenario) and need to make an edit...

> Rather than using PDF > File > Place > InDesign File... can place one InDesign file in another.
> YOU CANNOT PLACE A POSTSCRIPT FILE.

> When placing InDesign files click 'Show Import Options'.
> Bleed will be excluded- use the bleed bounding box to include the bleed- can't include crop marks (unlike a PDF...the advantage), therefore, we go to the original InDesign file to add crop marks.
> Use the 'slug' bounding box option.
> To edit document... File > Document Settings > Add 10mm slug all round (add your own crop marks).

* If your mouse is over the page, the guide will only fit the page/image, off the image/page for guides off the doc.

* Update file (original) and then double click warning triangle in links palette to update the links in the new file.
* Open > Place > PDF (8 page booklet).
> PDF files are like AI files- when there's nothing in the page, it will be classed as a transparent background.

* Acrobat symbol and + means there's more than one page to place.

* To insert symbols...

> Either go through Type > Glyphs, or...
> System Preferences > Language & Text > Input Sources > Keyboard & Character Viewer... Gives you the option for shortcuts and for selecting symbols and glyphs (highlighted for accents, etc).


Tuesday, 20 November 2012

Design Practice III//Print Workshop III 201112.


Notes from today's (third) print workshop with tutor/technician, Mike Flower, with documentation of the morning's session shown through notes and screenshot images below.

//

NOTES


* Any distances based around corner of the frame with ref diagram marker. Can change position of content o the page with accuracy with x, y, w, h.


* For hyphenation, you can turn off in paragraph palette, but when justifying (flush) the text is less even and the density of words on a line aren't necessarily consistent.
* Can alter hyphenation specification through paragraph menu/palette selection.


* Can override hyphen settings with discretionary hyphens to alter the density of the text.
 Type menu > Insert special character > Discretionary hyphen (Cmd + Shift + hyphens).
* You have to have hyphenation turned on to use discretionary hyphen.
* In the case of ragged right text (see screen shot above) looking messy, you can adjust the width of the frame, make soft returns (shift and return).


* In the same place as paragraph styles, we can set up character styles, applying to characters as opposed to an entire paragraph. Create a character style in the same way- have to select 'new character styles' in menu (font family, style, colour, etc). The paragraph will not be altered when character style edits are made.


* Hanging headings achieved by Cmd + \, can make type and font changes through new paragraph settings.


* Drop caps and nested styles (through paragraph styles), you need to use a character style. Click 'new nested style', click drop down selection. Consider how it will be applied.


* MASTER PAGES- Relevant to multi-page documents, reader's spreads in InDesign- pages appear as they would be when printed, trimmed and bound. At the bottom- left hand side 'A- Master' (or your relevant master page) will appear as text.
* You can add content to a master page, and all content on this page will be consistent. 
* Can unlock with Cmd + Shift, master page frames to make edits on the page.
* Go through page menu and 'override all master page items' to make edits.
* Drag and drop master pages onto page icons to apply to pages.
* Can drag the 'None' onto a page for no existing master page.
* To enter folio, Type > Insert Special Character > Current Page Numbers.
* Folios- page menu > numbering & selection options > start page numbering at... (choose #).

INSTRUCTIONS TO PRINT

* For booklet printing, we need to work on pagination (for mock ups).
* For pagination... Make a two-column table (L side and R side). The first page, in binding, is ALWAYS right. Write the numbers 1, 2, 3, etc in R-L diagonally, alternately on the table, and then when you reach your half-way page marker, write the numbers from bottom to the top of the table in reverse diagonal form.
* All page numbers, side by side, when added together should make the total number of booklet pages (simple maths to ensure that pagination is done successfully).
* Saddle stitch booklets always need to have a page number which is divisible by four.
* File > Print Booklet, choose type of binding that is going to be used (Short edge binding)... click print to go back to InDesign dialogue box.
* Save book as Postscript file (uncompressed PDF)- PPD Postscript Printer Description, Adobe PDF 9.0 paper sizes can go up to A0.