
After all my intial research and design preperation, I have now come to the final stages of my design- ready to create my page layouts ready for print in the adobe illustrator programme.

The image above shows my final design layout for my hot dog fold book- complete with correct alphabetical order, the name of the language, the written translation, phonetic translation, the countries in which the languages are spoken, and the place where the image of the native country will be- exactly how they will be printed.

I began on the inside sections of my book (naturally, they would take less time- and would give me good practice in using the pen and trace method for my large pull-out map poster). I re-traced the eight countries I was focusing on, and went onto re-produce them as vectors.

For my colour palette, I was inspired by the vintage map hearts that I had previously cut out- I really like the slightly faded, yet traditional colours that I felt would help to achieve a timeless look- suited for all age groups and genders.

Although I had originally wanted to use only the colours from my papercut vintage map hearts, I found that a few looked a little dull besides the bright white background (which, when printed, will be off-white cartridge paper)- therefore, I went into the swatches and chose a deep blue colour from the 'Earthtone' section- perfect for my natural and organic colour palette.

I then went on to fill in all other necessary information on the page:
-the country name
-the written translation of "i love you"
-the phonetic translation of the writing
-the countries in which you would say this phrase
-the vectored image (country of origin)

I then completed the page with the folio (page number) in the bottom right-hand corner, the same blue for consistency and within speech marks- of course, being the main theme and focus of the booklet.


My first three countries completed. I liked the consistency of the pages- through colouring, alignment etc, though the content density would always be slightly different- dependant on the amount of the countries that spoke the particular language, a factor I really liked about the designs. There is certainly a consistency and flow throughout the book, but with each page still looking new, and, hopefully, maintaing interest throughout.


Despite the fact that the majority of my designs were quick and easy to produce, a few posed small difficulties- mostly, the Bengali and Mandarin page. As oppossed to "copy and paste" or typing many of the written translations, the adobe programme didn't recognise some of the Bengali or Mandarin characters, therefore, I had to reproduce them for myself- importing them into photoshop, to then print screen and paste back into illustrator, and use the live trace tool to re-create them. I was very pleasantly surprised by the results- the stroke size being not too difficult to emulate, and with a steady hand on the live trace tool, I hope that the symbols look naturalistic and blend well into the text around them.

Although all of my other scans were easy to use and create vectors from, I was finding my A0+ world map illustration (which I had scanned in parts onto an A2 scanner- the largest I had accesibility to!) very hard to align. Therefore, I looked for various stock images I could trace from to create my world map poster in the inside of my hot dog booklet. I found several, and attempted to trace these, but I found there wasn't half as much detail on them as I would have liked.
Therefore, I finally concluded to use the image above- with a lot of detail, and I liked the circular vectors, used to represent small clusters of islands- creating a bit more of a contemporary feel than minute detail- a style which I hope to use in my own design.

Around mid-way through my trace, it suddenly dawned on me that, for some reason, the map I was tracing from had no Antartica illustrated- therefore, I finished my trace of this image, and then found an image of the Antartic to trace, and scaled and placed this appropraitely into my design.

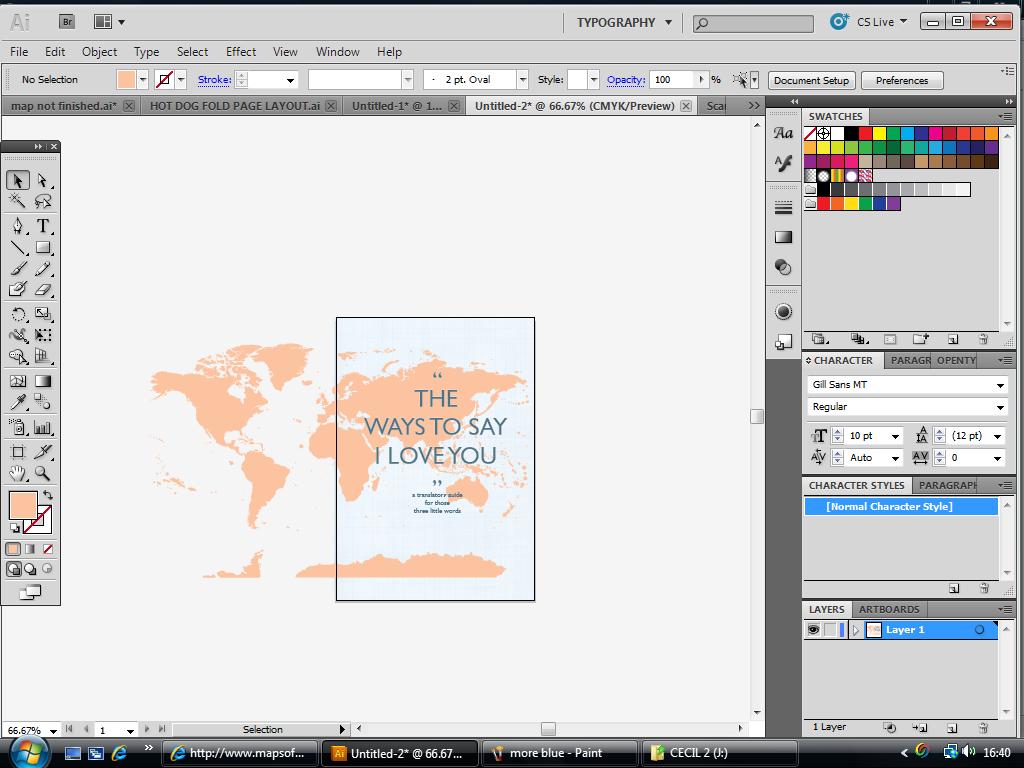
After completing my world map and colouring it the same mint green as my inside land vector images, I added the typographic title (I chose Gill Sans- see design context blog for further reasoning!) in the same blue colouring I had used within my booklet. For the title, I added a white outline to ensure it stood boldly from the vectored map image, and drew in a heirarchical focus.
I liked the design, but felt it looked a little plan, and could benefit from a little more interest, thus, I decided to experiment with different backgrounds...


After trying out all of the different textures as both backgrounds and overlays, I found the last scan, blue grid paper, definately looked the best- working with my colour scheme and the vintage- like style I had found and admired in my research.

Lowering the opacity of the grid paper background to 45% certainly helped- a lot less "in your face" now- much more of an enhancement as oppossed to detracting attention from the content.

After a comment from my partner "that green is a bit geography teacher" (despite his father being a one-time geography teacher, this didn't sound like a positive), I felt it a good insentive to play around with colours a little.
I liked this slightly brighter green, after comparing I felt that this looked far fresher and eye-catching, whilst still having a "classic" look.

...but you can get too much of a good thing! A little too bright in my experience- not a great colour with the blue writing (which I was admant to keep).

...I quite liked this colour, though felt it was inappropriate for the content. Perhaps (stereotypically) looked a little male-orientated, and people would normally associate blue on maps and throughout cartography with the ocean- so not a natural choice that people could automatically relate to.
As this product is part of a live brief, being made with the intention (and hope!) of sale, I certainly don't want to alienate my potential customers, and, as we all know, more often that not, people DO "judge a book by it's cover".
...again, another flawed experiment. Perhaps a little too feminine this time.

With all of the elements for the "language" side of my hot-dog fold booklet complete, I created a red border around all of the images, and placed them onto an A3 spread to arrange them as they would be printed (in these screenshots, some of the text is out of line, but that is because on my home computer, the font I intend to use is unavailable- and has chosen another variation of Gill Sans which has slightly wider kerning- of course, this will be altered and captured pre-print).
During this stage I had to calculate the correct pages sizes and proportions (particularly in the centre pages where my designs are half scaled to fit two per page)...
-Total dimension of hot dog fold booklet when unfolded: 420x297mm
-Dimensions of hot dog fold booklet when folded in half (horizontally): 420x(approx)150mm
-Dimensions of each leaf: 105x150mm
-Dimensions of each leaf divided by two (for centre spread): 105x75mm

I then removed the red-box lines, though some of the images were ever-so slightly unbalanced- with headers, titles, folios, etc, which needed aligning...

...the finished product (with home computer font settings).

With the languages side of the hot dog fold booklet compelte, I went on to finalise the world map poster design. Firstly, by adding the grid background (again, I felt the light green colour looked a little lost against the bright white background)...

...to map the eight countries I would be focusing upon, I decided to once again use colours from the 'Earthtone' swatches- all similar tones which would work in harmony together, yet in very different colours to be easily distinguished on the map.

...Left-aligned with their specific countries, acting as a key for the map.

...the final product!
I'm quite pleased with my final design, and after many hours staring into a computer, and a twinge of RSI, it feels good to know that my ambitions for the project have, I believe, been fufilled. The design is quite different to my usual illustrative style, but I have really enjoyed experimenting and researching this info-graphics style, and have certainly kept my interest maintained with a love of cartography and geography.
I print these double-sided A3 designs on Monday, ready for project hand-in on Tuesday, and just hope that the book-buying public like them too!
No comments:
Post a Comment